Quick Start: Build a starlink VM
Getting started
Step 1 is to get a CANFAR resource allocation. See the Quick Start guide for info on doing this.
Outline
We will do the following steps:
- Launch a new VM Instance based on the starink_python_ubuntu image.
- Create a user account on that VM.
- Snapshot that Instance
- Shutdown the generic instance.
- Launch your custom instance / and / or / Submit a batch job.
Launch a new VM Instance based on the starink_python_ubuntu image.
- To get a starlink Instance log into the west.cloud.computecanada.ca dashboard.
- Click on the ‘Instance’ link in the left handside of the menu.
- Select the ‘Launch Instance’ link in the top right, above the list of runing instances.
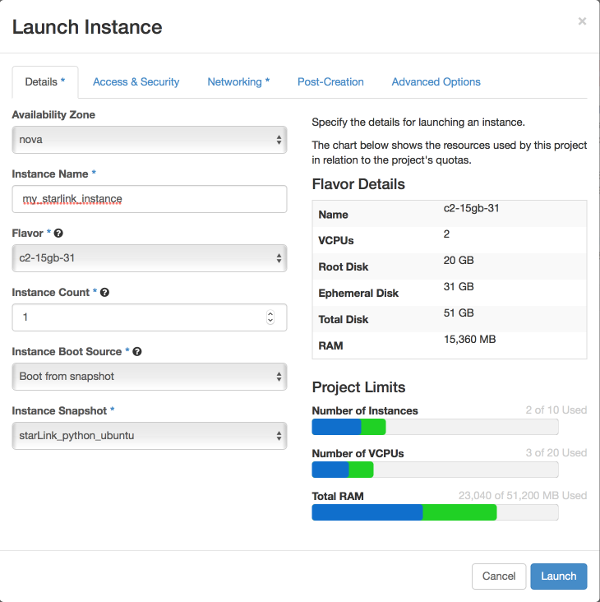
- Select starlink_python_ubuntu in the Launch Dialog:

- On the ‘Access & Security’ make certain your ssh key is selected (see the Quick Start guide for details).
- Click Launch
- In the ‘Instance’ listing, once the VM has started, select “Assocaite IP” and associate your public IP address to this VM.
Create a user account on that VM.
First, log into your VM:
ssh ubuntu@your.ip.address.here -i Path_to_your_private_ssh_key_hereNow, create a new user using the Create User script from the quick start tutoral, repeated here:
You might need to create a different user than the default one, and for batch processing to work, it is presently necessary for you to create a user on the VM with your CADC username. You can use a wrapper script for this:
curl https://raw.githubusercontent.com/canfar/openstack-sandbox/master/scripts/canfar_create_user.bash -o canfar_create_user.bash
sudo bash canfar_create_user.bash [username]
Modify your user environment to enable access to starlink
Next, add some lines to the .bashrc file using the following script:
  echo # added by Anaconda3 installer >> ${HOME}/.bashrc
  echo export PATH="/home/ubuntu/anaconda3/bin:\$PATH:/home/ubuntu/bin"  >> ${HOME}/.bashrc
  echo # added for starLink to work >> ${HOME}/.bashrc
  echo export STARLINK_DIR=/usr/local/star-2017A/ >> ${HOME}/.bashrc
  echo source \${STARLINK_DIR}/etc/profile >> ${HOME}/.bashrc
  sync
The ‘sync’ at the end ensures that the content is flushed to disk before we move on to creating a snapshot.
Adding the /home/ubuntu/bin directory to your path is to provide access to the cadc_plane_download.sh script. That script is a very simple one for accessing data associated with a JCMT Plan and provided below:
#!/bin/bash

PROTOCOL=https
URL=www.cadc-ccda.hia-iha.nrc-cnrc.gc.ca
ENDPOINT=caom2ops/pkg
ID=$1
curl --verbose -J -L -O -k -E ${HOME}/.ssl/cadcproxy.pem  ${PROTOCOL}://${URL}/${ENDPOINT}?ID=${ID}
## Snapshot that Instance Now that you have added your user account to the VM you should snapshot it as this is your personal VM.
- In the west.cloud.computecanada.ca OpenStack Instance Dashboard https://west.cloud.computecanada.ca/project/instances/ cick on the ‘Create Snapshot’ botton on the far right near your listing.
- Fill in the Snapshot dialogue. Give VM image a name you will remember.
Once the snapshot is finished saving, go back to the Instance Dashboard and terminate your VM. That will shutdown the VM you just made a snapshot of.
Use your VM.
You can now either Launch the snapshoted VM you just made, using the same processs as was just followed for the starlink_python_ubuntu snapshot but this time for your specificly named VM that has your use account.
OR
Log into the ‘batch.canfar.net’ machine and launch batch processing on the VM. To help with that I provide here my example script and a job submission file. Follow the batch_processing instructions to learn the basics of submitting batch jobs.
